Tuesday, June 19, 2012

Doctor Notes


As I prepare to go to Brooke's 2 month appointment, I think about the questions I have for the doctor and write them down in my "Doctor Notebook"...

I wanted to keep track of my kids weight/height and percentile rankings through the years.  At first, when I had only Derek, I had developed a table to keep track of questions and answers I had when visiting the doctor for well baby or sick appointments.  This also helps me keep track of his illnesses.  Every well baby appointment comes with a packet information that explains the shots he is getting at that time and developmental milestones that he should have reached and should be working on. 

After three years, Derek’s folder was very thick and I now had Brooke’s appointments to keep track of as well.  So I decided to make a Doctor Notebook.  I made a section for Derek, one for Brooke, and miscellaneous information.  At the beginning of each section a inserted a table that keeps track of age, weight, height, and percentile rankings.  Now I was able to toss all of Derek’s information sheets. (I’d be getting new ones for Brooke anyway!)  Behind this table I placed the sheets that I use to keep track of questions and answers.  This way I still have information from sick appointments.  Now I am only keeping the most current information sheet on each child.
Cover to my doctor notebook 

Derek's sheet that keeps track of his height/weight/percentile rankings from the past 3 years.

Brooke's note page, yes at 2 months she has been that many times. She had jaundice.

Miscellaneous...this is a dosage chart that I received at a clinic and I keep it in here to help me know how much Tylenol and Motrin to give based on age/weight.


***Before I had kids I had made a notebook like this for my cats.  It helps to keep track of each of their weights and of Bay’s surgery and recovery.

Friday, June 15, 2012

What Are We Doing Today?


As a teacher I was used to being off in the summer and home with my son anyway.  But now that I am a SAHM, I will be home with him and his sister every day.  He will not be going back to daycare in mid-August so it’s more than 9 weeks to keep him occupied.  Preschool starts in September and is only two mornings a week.  I like to be organized and have a plan.  I decided to make a calendar that shows the different things we will be doing through pictures.  This started in May when I made one showing when he would turn three and when he was going to have his party. The calendar is on our refrigerator and we cross off each day as it ends so that he can easily see what, if anything, we are doing the next day.  I used different icons to mean different things.  Things that I indicated are soccer, story time, the beach, birthdays, camp, fireworks for July 4th, a ferris wheel for carnivals, Giant for grocery day, and I have a school icon for when school starts.

He really enjoys looking at the calendar and seeing when things are going to happen.  It’s also a great way for him to start building calendar skills beyond just knowing the days of the week and being familiar with the months of the year.


End Of An Era


When I was 7 years old, in second grade, I had the best teacher.  She inspired me to want to be a teacher when I grew up.  After years of babysitting, working in a before and after school program and summer camps, and being a nanny for a few summers, I graduated and got a job as a kindergarten teacher.  In 2002 My dream had come true.  Through my years of working with kids from ages 3-17, I decided early childhood was where my heard was and I was now going to teach 5 year olds.

I spent only one year at my first school before being involuntary transferred. I interviewed at the job fair and went to another school where I would teach for the next nine years.  I had completed part of my student teaching at Ronald McNair Elementary and was now going to be teaching there with my mentor.  Three years later, my mentor decided to move on to another school after 16 years at McNair.  So I decided that I too needed a change and requested to move up to first grade where I would spend the next six years. 

Over the course of those six years, the first grade team changed a few times.  We acquired teachers new to our school and teachers that moved down to first grade from other grade levels.  A new special education teacher came on board and I was so lucky to get to work with her for two years.  Our students made such great gains and it was because of her and our collaboration with each other and our paraeducators.

In April of this year I had my second child, a little sister for our big boy.  Another dream of mine was about to come true.  Not only had I always aspired to be a teacher, but also a mom.  Now, I was already a mom, but I wanted nothing more than to stay home with my kids.  And now that dream has become a reality.  Today, I packed up my classroom at McNair, which has been my home away from home for 10 months out of the year for the past nine years.

Goodbye McNair and all of my coworkers and former students.  You have been such a big part of my life.  But it’s time to say goodbye and to move on to the next chapter: SAHM.
My empty room.
My reasons for leaving.

Thursday, March 8, 2012

Reasons For My Blog


I started my blog in 2010 when Derek was almost 18 months old.  There are a few reasons why I started it:

  1. To record his development.
  2. To record all of the things we are doing now that we have a child.
  3. To share ideas with friends.
  4. To share how my life and priorities have changed since becoming a mom.

My opinions are my own.  This blog is a record of my personal journey as a mom and homemaker and how my career as a teacher plays a part in all of this.  I look forward to continuing to share Derek’s growth and development as well as his sister’s when she arrives in May. 

Priorities have changed even more now that we are expecting a second child.  BIG decisions have already been made and will be executed within the next few months.  Stay tuned to see what comes next…

Tuesday, February 21, 2012

Sculptures In a Bag

The final product...Derek's "rocks".

I was looking for something different to do with Derek besides the usual watercolor, markers, and painting wooden frames etc.  I came across an idea to make a sculpture.

Materials:
1 cup of Plaster of Paris
½ cup of water
Ziploc bags
Paint

Add 1 cup of Plaster of Paris and ½ cup or water to a Ziploc bag. 
(**I found that using 1/2 cup of Plaster of Paris and 1/4 cup of water worked better)
Seal, letting out as much air as possible.
Double bag it (just in case!).


Now let your child squish and squeeze it.  In 10-15 minutes it will get warm and start to harden.  (**The original idea said it would only take a few minutes, I found that it took longer and Derek got bored.  He could have also been bored because he was tired.)


Once it has hardened, you can remove the bags and they are ready to paint.  (**I removed the bags over a trash can as there was some crumbling.  I also let them dry a bit longer before painting them.  They felt a little wet when I removed the bags.)


Finally, I got out the paints and Derek painted his “rocks” (as he calls them).

Monday, February 13, 2012

"Hand"-made Valentine's Day


I feel it is important for Derek to give hand-made gifts, especially at his age. They are more appreciated than something that I inevitably picked out at the store and signed his name to.  While Bryan and I don’t make it a habit to actually celebrate Valentine’s Day, we still want Derek to know it is a day to celebrate friendship and love.  So we went to work on his Valentine’s!
The main gift was a handprint heart that he made using a pink and a red handprint.  This of course required help from Mommy.  (idea from pinterest)  
Final Product

Messy Hands!!!


He also made cards for everyone in the family and his daycare teacher.  He used foam stickers and markers.  When working with the stickers, he wanted to know what all of the words said and he made sure that he put all of the purple hearts on Mommy’s card since he knows it’s my favorite color.


I made bookmarks for the students in my class. I used paint swatches and stamped a heart in each block, then attached a ribbon to the top.  The original design called for a heart shaped punch but I couldn’t find mine. (idea also from pinterest)


My final project for this weekend was actually the first one I made.  Our anniversary was February 10.  We celebrated 11 years together. Bryan loves martinis and olives so I saw this idea in a magazine for this card and decided it was perfect to make for this occasion.


Tuesday, January 24, 2012

A Homemade Christmas

With a growing family and a budget to stick to, Christmas 2011 had a focus on homemade gifts.  On Christmas Eve my fathers’ side of the family gets together. I always like to give a little something to my aunts and my sister.  This year I went completely homemade.

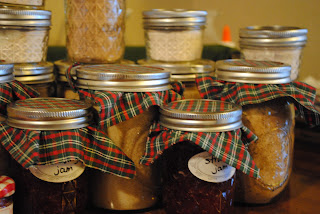
I made gifts boxes for each of them.  Some of the items I made include strawberry jam, hot mocha drink mix, hot pink drink mix, lemonade iced tea mix, and candles made in an old miniature jelly jar.  I also included Derek in the homemade gift project.  He made travel mugs and apple-cinnamon ornaments.  The items were put together in gift boxes I got from the Target dollar bins.
                                                                      My finished jars
                                 Candles made in jelly jars (the scents match the flavor on the jar)
                                                                Jam and Drink Mixes
                                              Derek working on his apple-cinnamon ornaments
                                                          Ready to bake the ornaments!
Finished gift box for my sister (Aunt Momma as Derek calls her).  Includes a travel mug and ornament made by Derek as well as a jar of Hot Mocha mix and Pink Drink mix.

The main gift I made for my parents and my sister was a joint effort between Bryan and myself.  I had this idea that I saw in a magazine to make a large letter depicting a last name.  This could be hung inside or outside.  So that I did not have to enlarge a letter and cut it out of wood myself, I searched several craft stores to find what I wanted.  JoAnn Fabrics had letters that were large enough to use for this project.  I got a D for my sister and an H for my parents.  The next step was to do the decorating.  Bryan helped me by cutting wooden dowels that had varying thicknesses.  He cut them into different lengths so that they would be varied on the letter.  After he was finished, he sanded the edges and I glued them onto the large letter.  The final project was sprayed with polyurethane so that it would be safe if it were to be hung outside.


This was a very rewarding way to give gifts this year and I already have a plan for Christmas 2012!